Delightful Daisy

SPRING countdown continues!  Tomorrow is the first day of meteorological SPRING, so I’m ready to celebrate!  The Delightful Daisy Suite is the perfect way to begin.

Delightful Daisy Designer Series Papers and Stamps Set

Stampin’ Up products are all coordinated for you to make designing and making these cards a DELIGHT!!

daisy dsp card w logo

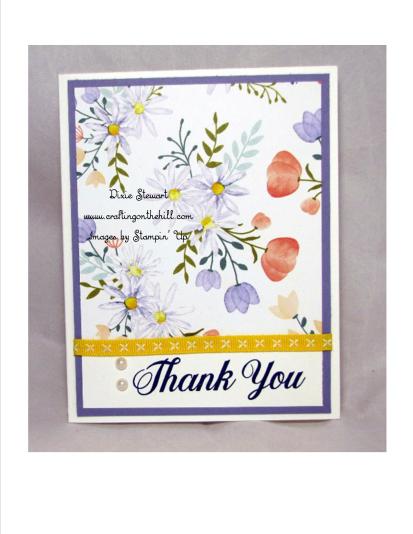
The Delightful Daisy Designer Series Papers has gorgeous designs that have lots of spring colors that coordinate with it.  This card has the Designer Series Paper mounted on Wisteria Wonder.  The sentiment and flower are from the Daisy Delight stamp set stamped in Flirty Flamingo.watercolor daisy w logo

The daisy stamp from the Daisy Delight stamp set was stamped twice in Berry Burst, then punched with Daisy Punch. A Clear Faceted Gem is the perfect touch for the center.  I used Berry Burst Ink to watercolor on a piece of the Watercolor Paper, then mounted it on Berry Burst Cardstock.  The sentiment is from the Colorful Seasons stamp set.

simple class daisy

This is one of the cards we made in the Spring Into Stamping Class this week.  The Daisy Delight Designer Series Paper made this card so quick and easy!  A strip of the Daffodil Delight Double Stitched Ribbon set the card off perfectly!

March Events

March 18 team meet

Monday, March 5th, 6-8:30 PM

Come join in the fun and find out how to join Stampin’ Up and the Crafting on the Hill Team!

Our Crafting on the Hill Monthly Team Meetings are held the first Monday of each month. This will be a monthly time for Team Achievement Recognition (with prizes!), an overview of Stampin’ Up news and events, as well as stampin’ time and the fun of being together as a Team. AND a Door Prize!

Please bring scissors and adhesives.

Cost is $5. Light supper served beginning at 6 PM.

Please RSVP by Sunday, March 4th.


Monday, March 12th, 6:30-8:30 PM

Tuesday, March 13th, 10 AM-12 Noon or 6:30-8:30 PM

This monthly Quick and Easy Cards Class is a great way to build your cards stash with some beautiful handmade cards. For this class we’ll be using the Sweet Soiree Suite to make 6 cards, 2 each of 3 designs, including envelopes and inside sentiments.

New Customers: You will receive a FREE copy of all current catalogs.
**Class is $15 or FREE with a $20 minimum product order. FREE Sale-A-Bration Product with each $50 Product Order!
**Please bring adhesives and scissors. I do have adhesive available for purchase.
**RSVP for this FUN class by Sunday, March 11th.
**Held at Crafting on the Hill Studio just north of Jasper.

Bring a friend and you AND your friend get a FREE Grab Bag of Stampin’ Up Products worth $20!

Stampin’ Blends Class

Thursday, March 15th, 6:30-8:30 PM

Say hello to a new world of colorful creativity with Stampin’ Up’s premiere alcohol markers. These high quality dual tip markers each have a light and dark shade to give you the best blending experience.

This class includes:
1. Two Stampin’ Blends of your choice (suggest you choose a light and dark shade of two different colors)
2. Color Lifter Stampin’ Blend
3. One fourth of the Color Me Happy Project Kit
4. Time of instruction and practice with the Color Me Happy Stamp Set.

Class Supplies needed:
1. Tuxedo Black Memento Ink Pad
2. Adhesive
3. Scissors
4. Bone Folder

If you do not have the Memento Ink Pad, you may add $6 to the class fee and I will order you one. I also have SNAIL adhesive runners available for sale.

Class fee is $28. Deadline to sign up and pay class fee is Thursday, March 8th, so class supplies can be ordered. You may let me know your color choices when you sign up and pay.

You may view the available colors at www.craftingonthehill.stampinup.net.

26907064_1086656044809425_291900955992961869_n1

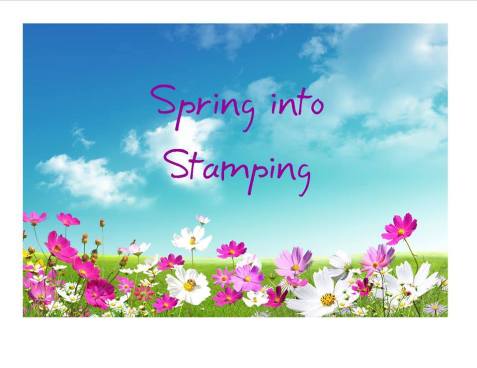
Monday, March 19th, 6:30-8:30 PM

Let’s Spring into Stamping this Spring with this special 3 month class.

This Class will be for beginning stampers or those who just want a refresher course so they can get back into stamping and papercrafting. Each month, we will make 2 cards with step by step instructions. Learn about things like:

1. Stamping—how to stamp clear images
2. Inks—which inks to use for different applications, as well as how to use Stampin’ Up Ink Pads
3. Adhesives—how to select the best adhesives for different projects
4. Cardstock—how to choose the correct cardstock for your projects
5. Big Shot—how to use this awesome diecutting and embossing machine

This will be a 3 month class in February, March and April. If you have scissors, adhesives or a Stampin’ Trimmer, please bring them. If you don’t, come anyway and I’ll help you know how to select them!

We will create 2 cards each month, envelopes included, with lots of teaching, tips and techniques. Cost for this Class is $10 and your payment will be your registration. Please RSVP by the Friday before each Class.

All Classes are held at Crafting on the Hill Studio. Directions will be given when you register.

12-01-17_th-shareable3_sab_pre-earn_eng7abf7c1b0be1686086dbff0000ec372d

Go to http://www.craftingonthehill.stampinup.net  and click on the “Join the Fun” tab.  Or contact me TODAY and let’s get you started!  Join Stampin’ Up and the Crafting on the Hill Team during

Sale-A-Bration

through March 31st and get two FREE Stamp Sets!!  That’s in ADDITION to the $125 of Stampin’ Up Product of YOUR CHOICE for just $99 plus FREE Shipping!  Find out more at http://www.craftingonthehill.stampinup.net.

I’m here to be your Creative Coach and bring out your “inner crafter!”

 Just contact me and we’ll talk!

I ALWAYS look forward to hearing from you!!

The Blessed and Happy Stamper,

Dixie

All artwork copyright © Stampin’ Up!® and Dixie Stewart, Independent Stampin’ Up!®Demonstrator. The content of this blog is my sole responsibility as an independent Stampin’ Up!® demonstrator and the use of, and content of, the classes, services, or products offered on this blog is not endorsed by Stampin’ Up!®


Advertisement
Southern Serenade

Southern Serenade

Southern Serenade Parade of Colors!

The Southern Serenade Stamps Set from the Occasions 2018 Catalog just sings to me!  Such a beautiful set and paired with the Stampin’ Blends it produces gorgeous projects.

serenade 3 w logo


This is colored with the Daffodil Delight and Old Olive Stampin’ Blends Combos.  I adhered it to half of a Doily and the Petal Garden Designer Series Paper Stack, mounted on a sheet of Daffodil Delight Cardstock.  I added a piece of the Daffodil Delight Double Stitched Ribbon for just the right accent.  The sentiment is from the Southern Serenade Stamp Set, then cut out with a Stitched Shapes Framelit.

serenade 4 w logo

The Rich Razzleberry Stampin’ Blends Combo Set just makes the flowers pop!  I used Sweet Sugarplum Cardstock and paper from the Color Theory Designer Series Paper Stack.  The sentiment is from the Petal Palette Stamps Set.  I used the Fresh Fig 1/8″ Sheer Ribbon for a contrast.

welcome card with logo

I entered this card in an online challenge, and I won!!  Woohoo!  Pool Party is one of my favorite colors, so that’s what I used here, as well as the Color Theory Designer Series Paper.  I used the Banners For You Stamps and the coordinating Bunches of Banners Die Set for the sentiment.

serenade pink w logo

I thought the Wood Textures Designer Series Paper Stack provided a great contrast with the Pink Pirouette.  I used the new Simple Stripes Textured Impressions Embossing Folder to add a little more texture.  Linen Thread is one of my favorite accents–so versatile!


Lovely lace and great sentiments really make this Southern Serenade Stamp Set a “not to missed” item to order!

Stampin’ Blends are incredible.  They easily make me look like an artist!  They’re available as a complete set, or you may purchase them singly or as a combo pack.  Such a great variety of colors! You really need to see, feel, touch them to see what beautiful projects they produce.


There’s an upcoming Class where you can do just that!

Stampin’ Blends Class

Tuesday, February 20th, 6:30-8:30 PM

Say hello to a new world of colorful creativity with Stampin’ Up’s premiere alcohol markers. These high quality dual tip markers each have a light and dark shade to give you the best blending experience.

This class includes:
1. Two Stampin’ Blends of your choice (suggest you choose a light and dark shade of two different colors)
2. Color Lifter Stampin’ Blend
3. One fourth of the Color Me Happy Project Kit
4. Time of instruction and practice with the Color Me Happy Stamp Set.

Class Supplies needed:
Tuxedo Black Memento Ink Pad

2. Adhesive
3. Scissors
4. Bone Folder

If you do not have the Memento Ink Pad, you may add $6 to the class fee and I will order you one. I also have SNAIL adhesive runners available for sale.

Class fee is $28. Deadline to sign up and pay class fee is Friday, February 9th, so class supplies can be ordered. You may let me know your color choices when you sign up and pay.

You may view the available colors at www.craftingonthehill.stampinup.net.

Quick and Easy Cards Classes

Monday, February 12th and Tuesday, February 13th, 6:30-8:30 PM


This monthly Quick and Easy Cards Class is a great way to build your cards stash with some beautiful handmade cards. For this class we’ll be using the Petal Palette Suite to make 6 cards, 2 each of 3 designs, including envelopes and inside sentiments.

New Customers: You will receive a FREE copy of both the 2018 Occasions Catalog AND the Sale-A-Bration Brochure!

**Class is $15 or FREE with a $20 minimum product order. FREE Sale-A-Bration Product with each $50 Product Order!
**Please bring adhesives and scissors. I do have adhesive available for purchase.
**RSVP for this FUN class by Sunday,February 11th.
**Held at Crafting on the Hill Studio just north of Jasper.

Bring a friend and you AND your friend get a FREE Grab Bag of Stampin’ Up Products worth $20!

Sale-A-Bration!

For EACH $50 Product Order, select one FREE Item from the Sale-A-Bration Brochure.  NEW Items coming February 16th, including Designer Series Paper and a Deep Textured Impressions Embossing Folder!  Cannot wait!

01-03-17_header_sab_na

Want to know more?  Go to my website at www.craftingonthehill.stampinup.net and click on the “Join the Fun” tab.  Or contact me TODAY and let’s get you started!

I’m here to be your Creative Coach and bring out your “inner crafter!”

 Just contact me and we’ll talk!

I ALWAYS look forward to hearing from you!!

The Blessed and Happy Stamper,

Dixie

All artwork copyright © Stampin’ Up!® and Dixie Stewart, Independent Stampin’ Up!®Demonstrator. The content of this blog is my sole responsibility as an independent Stampin’ Up!® demonstrator and the use of, and content of, the classes, services, or products offered on this blog is not endorsed by Stampin’ Up!®

Summer in the South…

There’s nothing quite like the delights of Southern Summers!  I love the long days and warm nights, the sound of the katydids at night, watermelon and snapping fresh green beans on the front porch.  The best part of the summer for me has been visiting with the grands–ALL of them!  Being with them in TN and Maryland has sidetracked my blogs this summer, but what joy for this Nana!  A favorite part of the summer for the kiddos is….

Bike Rides!

At the Crafting on the Hill Summer Stampin’ Team Party last week, we made a card using the fantastically fun Bike Ride Bundle.  I got my first bike for my 9th birthday, and it was BLUE, so I had to make this one blue!

Bike ride with logo

  • I stamped the bike body, tires and rear mount in Pacific Point, one of my favorite Stampin’ Up colors.  Bike rims are stamped with So Saffron.
  • The handles, seat, and brake are stamped with So Saffron, but you could also use a So Saffron marker.
  • The basket is the two stamp baskets, both stamped in Early Espresso.  The base was stamped full strength, the second stamp was stamped off.
  • The flowers were stamped in Wild Wasabi, then colored with Calyspo Coral and Wild Wasabi Stampin’ Write Markers.
  • The “road” and the banner are Crushed Curry from the Color Theory Designer Series Paper Stack.
  • The sentiment is from the Birthday Delivery Stamps Set (one of my favorites!), stamped in Pacific Point.  I used the Layering Ovals Framelits to cut out Pacific Point Cardstock and the sentiment.
  • Adhere the strip of Color Theory DSP. Mount the tires on Stampin’ Dimensionals.  Use glue dots to attach the bike body and rear mount to the tires, then attach to the card base.  Adhere the basket, then the flowers with Stampin’ Dimensionals.
  • On each tire and the banner, I used coordinating Enamel Shapes.

Such a great summery card!

Here’s the Bundle I used:

Bike Ride Photopolymer Bundle

Item 145314

Paper Pumpkin Alternate Ideas–And Watermelons!

The June Paper Pumpkin Kit was One in a Melon and it’s luscious!  It was my first experience stamping images of one of my favorite fruits.  Yummy!

Here are couple of the alternates I made:

June 17 PP Kit alternates

The July Paper Pumpkin Kit is Perfectly Picturesque and it makes some stunning cards.

July 17 pp kit tulips

I altered the mountains to look more like the beautiful mountains of North Georgia!

July 17 pp kit mountains

I used the Eastern Palace Designer Series Paper–really liked how the colors coordinated.

July 17 pp kit hooray

Not a subscriber?  Become one today by going here

and get access to the refill for this and several other Kits.

I’m here to be your Creative Coach

and bring out your “inner crafter!”

 Just contact me and we’ll talk!

I ALWAYS look forward to hearing from you!!

The Blessed and Happy Stamper,

Dixie

All artwork copyright © Stampin’ Up!® and Dixie Stewart, Independent Stampin’ Up!®Demonstrator. The content of this blog is my sole responsibility as an independent Stampin’ Up!® demonstrator and the use of, and content of, the classes, services, or products offered on this blog is not endorsed by Stampin’ Up!®